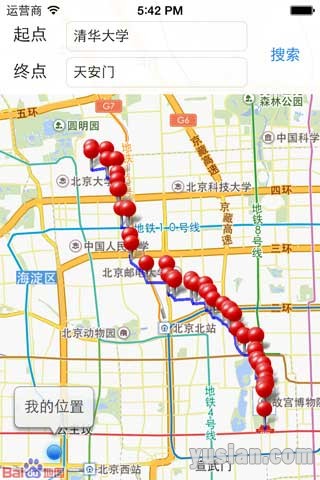
一、先看效果图:
二、实现步骤
1、创建基本视图(这一步可先跳过,直接在代码中写入需要传入的数据即可)
2、实现定位功能,这不是该Demo的核心,甚至可以去掉,具体做法可参照http://www.yusian.com/bbs/thread-8375-1-1.html
3、如何计算两地的路径并在地图上展现出来(重点)
3.1、创建两个点(BMKPlanNode类,如果是步行创建后给name及cityName赋值即可)
3.2、路径计算选项(步行、公交、自驾等),发起搜索
3.3、在代理方法中获取网络计算结果
3.4、处理计算结果(复杂的来了,做好准备!!)
3.4.1、如果是步行计算结果返回的是一个BMKWalkingRouteResult对象
3.4.2、该对象中有个结果为BMKWalkingRouteLine类型的数组,因为有可能会有多条线路
3.4.3、我们取第一条线路(数组中的第一个元素,一般最优的放在最前面)
3.4.4、该对象中有个结果为BMKWalkingStep类型的数组,一条线路中分为多个路段(因为会有岔路嘛)
3.4.5、我们取出所有的路段,每个路段都会有个入口信息与出口信息BMKRouteNode类型数据,这个可做为路径点标注使用
3.4.6、每个路段信息中包含了该路段的地理坐标集合:BMKMapPoint类型数据的组数,我们最终的目的就是为了取出这个数组中的所有元素;
3.4.7、BMKMapPoint数组是一个c语言数组,不能直接用oc的语法去处理,之所有要取出所有的这种类型数据是因为我们最终的路径是由这些点组成,然后再用折线将这些点连接成线!
3.4.8、小结一下,关键性的三个数组:路线–路段–路径点(BMKWalkingRouteLine–BMKWalkingStep–BMKMapPoint)
3.5、获取到所有的路径点之后,将这个数组传给绘图类BMKPolyline,让其绘出折线,其实所谓的路径曲线就是由很多条小段的折线组成。
3.6、通过mapView的代理方法,将折线展示到地图上,路径规划大功造成!
三、关键性代码示例
1 2 3 4 5 6 7 8 9 10 11 12 13 14 15 16 17 18 19 20 21 22 23 24 25 26 27 28 29 30 31 32 33 34 35 36 37 38 39 40 41 42 43 44 45 46 47 48 49 50 51 52 53 54 55 56 57 58 59 60 61 62 63 64 65 66 67 68 69 70 71 72 73 74 75 76 77 78 79 80 81 82 83 84 85 86 87 88 89 90 91 92 93 94 95 96 97 98 99 100 101 102 103 104 105 106 107 108 109 110 111 112 113 114 115 116 117 118 119 120 121 122 123 124 125 126 127 128 129 130 131 132 133 134 135 136 137 138 139 140 141 142 143 144 145 146 147 148 149 150 151 152 153 154 155 156 157 158 159 160 161 162 163 164 165 166 167 168 169 170 171 172 173 174 175 176 177 178 179 180 181 182 183 184 185 186 187 188 189 190 191 192 193 | #import "SAViewController.h" #import "BMapKit.h" @interface SAViewController () <BMKRouteSearchDelegate, BMKMapViewDelegate, BMKLocationServiceDelegate> @property (nonatomic, strong) BMKLocationService *location; // 定位服务 @property (nonatomic, strong) BMKRouteSearch *routeSearch; // 路径搜索 @property (nonatomic, strong) BMKMapView *mapView; // 地图 @property (weak, nonatomic) IBOutlet UITextField *start; // 出发地 @property (weak, nonatomic) IBOutlet UITextField *end; // 目的地 // 开始搜索 - (IBAction)search; @end @implementation SAViewController - (void)viewDidLoad { [super viewDidLoad]; // 添加地图视图 self.mapView.frame = self.view.frame; [self.view insertSubview:self.mapView atIndex:0]; // 开启定位服务 self.location = [[BMKLocationService alloc] init]; self.location.delegate = self; [self.location startUserLocationService]; } - (void)viewWillAppear:(BOOL)animated { [super viewWillAppear:animated]; [self.mapView viewWillAppear]; } - (void)viewWillDisappear:(BOOL)animated { [super viewWillDisappear:animated]; [self.mapView viewWillDisappear]; } - (BMKMapView *)mapView { if (!_mapView) { _mapView = [[BMKMapView alloc] init]; _mapView.delegate = self; } return _mapView; } - (BMKRouteSearch *)routeSearch { if (!_routeSearch) { _routeSearch = [[BMKRouteSearch alloc] init]; _routeSearch.delegate = self; } return _routeSearch; } #pragma mark 定位服务的代理方法,如果获取到位置信息则调用 - (void)didUpdateUserLocation:(BMKUserLocation *)userLocation { // 定位成功后将当前的位置设置为地图的中心点 self.mapView.centerCoordinate = userLocation.location.coordinate; // 地图的缩放比例的17 (3 ~ 19取值) self.mapView.zoomLevel = 13; // 停止定位服务 [self.location stopUserLocationService]; // 显示我当前的位置 self.mapView.showsUserLocation = YES; [self.mapView updateLocationData:userLocation]; } #pragma mark 点击空白处退出键盘 - (void)touchesBegan:(NSSet *)touches withEvent:(UIEvent *)event { [self.view endEditing:YES]; } #pragma mark 搜索事件 - (IBAction)search { [self.view endEditing:YES]; // 创建一个起始点 BMKPlanNode *start = [[BMKPlanNode alloc] init]; start.name = self.start.text; start.cityName = @"北京"; // 创建一个终点 BMKPlanNode *end = [[BMKPlanNode alloc] init]; end.name = self.end.text; end.cityName = @"北京"; // 创建一个步行选项 BMKWalkingRoutePlanOption *option = [[BMKWalkingRoutePlanOption alloc] init]; option.from = start; option.to = end; // 搜索步行选项结果(结果在代理方法中去取) [self.routeSearch walkingSearch:option]; } #pragma mark 获取步行路径数据 - (void)onGetWalkingRouteResult:(BMKRouteSearch*)searcher result:(BMKWalkingRouteResult*)result errorCode:(BMKSearchErrorCode)error { // 清空地图上所有的标注及所有覆盖物 NSArray* array = [NSArray arrayWithArray:_mapView.annotations]; [_mapView removeAnnotations:array]; array = [NSArray arrayWithArray:_mapView.overlays]; [_mapView removeOverlays:array]; // 返回正确结果 if (error == BMK_SEARCH_NO_ERROR) { // 1、取出路径数据中的第一条(一般可能会有多条路径可选) BMKWalkingRouteLine *plan = [result.routes firstObject]; // 将地图中心点转到路径的起点 self.mapView.centerCoordinate = plan.starting.location; self.mapView.zoomLevel = 14.0f; // 2、在地图上标注各路段点 int counts = 0; for (int i = 0; i < plan.steps.count; i++) { // 2.1、起点 if (i == 0) { // 初始化一个标注点 BMKPointAnnotation *point = [[BMKPointAnnotation alloc] init]; // 设定标注点坐标 point.coordinate = plan.starting.location; // 设定标注点标题 point.title = @"起点"; // 添加到地图 [self.mapView addAnnotation:point]; // 2.2、终点 }else if (i == plan.steps.count - 1) { BMKPointAnnotation *point = [[BMKPointAnnotation alloc] init]; point.coordinate = plan.terminal.location; point.title = @"终点"; [self.mapView addAnnotation:point]; // 2.3、中间路段起点 }else{ BMKWalkingStep *step = plan.steps[i]; BMKPointAnnotation *point = [[BMKPointAnnotation alloc] init]; point.coordinate = step.entrace.location; point.title = step.entraceInstruction; [self.mapView addAnnotation:point]; } // 计算出共经过多少个地理坐标,为后结创建数组提供长度 counts +=[plan.steps[i] pointsCount]; } // 3、取出路段所经过的地理坐标集合(c语言数组) BMKMapPoint temppoints[counts]; int count = 0; for (BMKWalkingStep *step in plan.steps) { for (int i = 0; i < step.pointsCount; i++){ temppoints[count] = step.points[i]; count++; } } // 4、将坐标点集合进行连线,生成折线添加到地图 BMKPolyline* polyLine = [BMKPolyline polylineWithPoints:temppoints count:counts]; [_mapView addOverlay:polyLine]; } } #pragma mark 地图添加覆盖物调用的代理方法,根据覆盖物描述生成视图显示到地图上 - (BMKOverlayView*)mapView:(BMKMapView *)map viewForOverlay:(id<BMKOverlay>)overlay { if ([overlay isKindOfClass:[BMKPolyline class]]) { BMKPolylineView* polylineView = [[BMKPolylineView alloc] initWithOverlay:overlay]; // 填充颜色 polylineView.strokeColor = [[UIColor blueColor] colorWithAlphaComponent:0.7]; // 画笔宽度 polylineView.lineWidth = 3.0; return polylineView; } return nil; } @end |
四、Demo下载
链接: http://pan.baidu.com/s/1c0pNa9M 密码: 7c7h