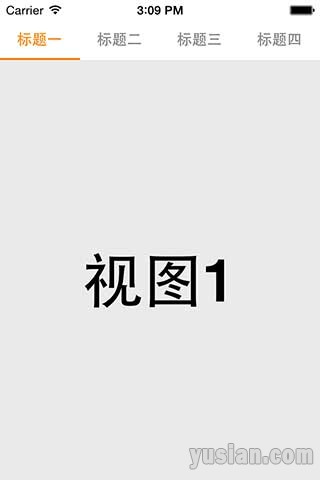
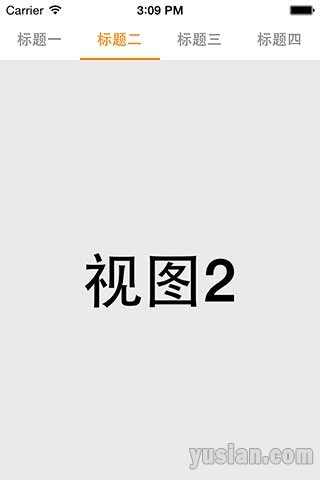
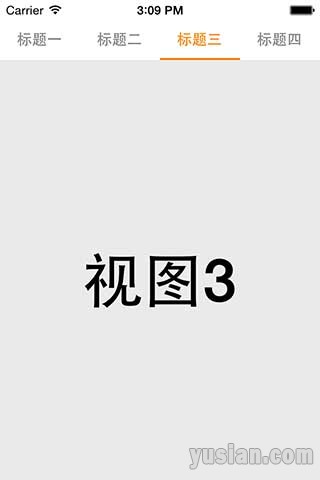
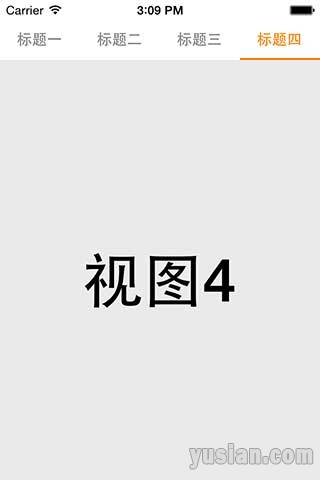
1、先上图,无图无真相无发言权
2、基本设计思路
2.1、该控件继承自UIView,在UIView上添加一个ScrollView,再在ScrollView上添加按钮及标记(UIView)
2.2、初始化的时候创建相关子视图(ScrollView、UIButton、UIView)
2.3、用户传入一个字符串数组,根据该数组创建相对应的按钮,并自动按顺序均匀摆放在视图上
2.4、当用户点击其中一个按钮时,该按钮处理选中状态,下标通过动画形式移动到该按钮下方,并通知代理处理相关事件(如:切换视图)
2.5、扩展性:为什么下面还要放一个ScrollView呢?因为当添加的按钮过多,无法一屏显示的时候需要能够左右拖动(这里还未实现,但预留了)
3、使用说明
3.1、代码创建:
SASwitchBar *switchBar = [SASwitchBar alloc] initWithItems:@[@”标题一” @”标题二”, @”标题三”, @”标题四”]];
switchBar.frame = (CGRect){0, 0, 320, 40};
[self.view addsubViews:switchBar]
3.2、xib创建:
3.2.1、拖拽一个UIView到你想要的位置,并设置大小
3.2.2、设置该View的Class为SASwitchBar
3.2.3、连线,设置标题,如:self.switchBar.title = [NSArray arrayWithObjects:@”标题一” @”标题二”, @”标题三”, @”标题四”, nil];
4、关键代码:
SASwitchBar.m
1 2 3 4 5 6 7 8 9 10 11 12 13 14 15 16 17 18 19 20 21 22 23 24 25 26 27 28 29 30 31 32 33 34 35 36 37 38 39 40 41 42 43 44 45 46 47 48 49 50 51 52 53 54 55 56 57 58 59 60 61 62 63 64 65 66 67 68 69 70 71 72 73 74 75 76 77 78 79 80 81 82 83 84 85 86 87 88 89 90 91 92 93 94 95 96 97 98 99 100 101 102 103 104 105 106 107 108 109 110 111 112 113 114 115 116 117 118 119 120 121 122 123 124 125 126 127 128 129 130 131 132 133 134 135 136 137 138 139 | // //? SASwitchBar.m //? MIG // //? Created by 余西安 on 14/12/13. //? Copyright (c) 2014年 Sian. All rights reserved. // #define kSignalH?? 2??????? //下标高度 #import "SASwitchBar.h" ? @interface SASwitchBar() { ????UIScrollView??? *_scrollView; ????UIView????????? *_signal;?????????? // 控件下标 ????UIButton??????? *_selectedItem;???? // 当前控件 } @end ? @implementation SASwitchBar #pragma mark - 初始化方法 // 基本控件创建 - (void)initialize { ????_signal = [[UIView alloc] init]; ????_scrollView = [[UIScrollView alloc] init]; ????[self addSubview:_scrollView]; ????[_scrollView addSubview:_signal]; ????? } ? // 供xib形式创建 - (instancetype)initWithCoder:(NSCoder *)aDecoder { ????if (self = [super initWithCoder:aDecoder]) { ????????[self initialize]; ????} ????return self; } ? // 以代码形式创建 - (instancetype)init { ????if (self = [super init]) { ????????[self initialize]; ????} ????return self; } ? // 以代码形式创建 - (instancetype)initWithItems:(NSArray *)items { ????if (self = [super init]) { ????????[self initialize]; ????????[self setItems:items]; ????} ????return self; } ? // 子控件位置尺寸调整 - (void)layoutSubviews { ????_scrollView.frame = (CGRect){CGPointZero, self.frame.size}; ????? ????NSInteger items = self.items.count; ????CGFloat btnW = self.frame.size.width / items; ????CGFloat btnH = self.frame.size.height - kSignalH; ????for (int i = 0; i < items; i ++) { ????????UIButton *btn = self.items[i]; ????????btn.frame = CGRectMake(i * btnW, 0, btnW, btnH); ????} ????_signal.frame = CGRectMake(0, btnH, btnW, kSignalH); } ? #pragma mark - 成员属性设置 // 设置选择项(传入字符串数组,创建对应选择控件) - (void)setItems:(NSArray *)items { ????NSMutableArray *array = [NSMutableArray array]; ????? ????// 创建多个按钮并设置tag,添加到ScrollView ????for (int i = 0; i < items.count; i++) { ????????UIButton *btn = [UIButton buttonWithType:UIButtonTypeCustom]; ????????btn.tag = i + 1; ????????[array addObject:btn]; ????????[btn setTitle:items[i] forState:UIControlStateNormal]; ????????btn.titleLabel.font = [UIFont boldSystemFontOfSize:15]; ????????[btn setTitleColor:[UIColor grayColor] forState:UIControlStateNormal]; ????????[btn addTarget:self action:@selector(switchItem:) forControlEvents:UIControlEventTouchUpInside]; ????????[_scrollView addSubview:btn]; ????} ????_items = [NSArray arrayWithArray:array]; ????? ????// 默认选中颜色为橙色,选中第一个控件 ????self.selColor = [UIColor orangeColor]; ????self.selectedIndex = 0;; } ? // 当前选中序号(下标跟随选中控件移动位置) - (void)setSelectedIndex:(NSInteger)selectedIndex { ????_selectedIndex = selectedIndex; ????[self switchItem:self.items[selectedIndex]]; } ? // 设置高亮颜色(选中控件文字颜色及下标颜色) - (void)setSelColor:(UIColor *)selColor { ????_selColor = selColor; ????_signal.backgroundColor = selColor; ????for (UIButton *btn in self.items) { ????????[btn setTitleColor:selColor forState:UIControlStateSelected]; ????} } ? #pragma mark - 事件处理 // 按钮事件 - (void)switchItem:(UIButton *)button { ????// 切换按键,变量按钮控件状态 ????_selectedItem.selected = NO; ????_selectedItem = button; ????button.selected = YES; ????? ????// 调整下标位置,动画效果过渡 ????CGRect rect = button.frame; ????CGFloat x = rect.origin.x; ????CGFloat y = rect.origin.y + rect.size.height; ????CGFloat w = rect.size.width; ????CGFloat h = rect.size.height; ????[UIView animateWithDuration:0.3 animations:^{ ????????_signal.frame = CGRectMake(x, y, w, h); ????}]; ????? ????// 通知代理 ????if ([self.delegate respondsToSelector:@selector(switchBar:seletedIndex:)]) { ????????[self.delegate switchBar:self seletedIndex:button.tag]; ????} } @end |
5、Demo下载:SASwitchBar
Pingback: 轻松实现标签视图切换效果 | 小龙虾博客 (Crayfish)