一、基本绘图方法
1、移动画笔位置方法形式如 CGContextMovexxxx, 如:CGContextMoveToPoint(CGContextRef c, CGFloat x, CGFloat y)为移动到坐标(x, y)
2、描述图形方法如 CGContextAddxxxx,如:
CGContextAddLineToPoint(CGContextRef c, CGFloat x, CGFloat y),描述一个线段从当前画笔点到点(x,y)
GContextAddRect(CGContextRef c, CGRect rect),根据传入的rect描述一个矩形,rect中指定了位置与尺寸
CGContextAddEllipseInRect(CGContextRef context, CGRect rect),根据传入的rect描述一个在rect中能容纳的最大椭圆,如果为rect中width与height相等则为圆
CGContextAddArc(CGContextRef c, CGFloat x, CGFloat y, CGFloat radius, CGFloat startAngle, CGFloat endAngle, int clockwise),该函数为画一段圆弧,传入的参数分别为:上下文,圆心x坐标,圆心y坐标, 半径, 开始弧度值,结束弧度值,顺时钟(1为顺时钟,0为逆时钟)
3、图形设置方法如 CGContextSetxxxx,如:
CGContextSetRGBFillColor(CGContextRef context, CGFloat red, CGFloat green, CGFloat blue, CGFloat alpha),填充图形时使用的颜色RGB与透明度值
4、图形渲染 CGContextxxxxPath(),如:
CGContextFillPath(CGContextRef c), 渲染为实心图形
CGContextStrokePath(CGContextRef c), 渲染为空心图形
二、示例代码
1 2 3 4 5 6 7 8 9 10 11 12 13 14 15 16 17 18 19 20 21 22 23 24 25 26 27 28 29 30 31 32 33 34 35 36 37 38 39 40 41 42 43 44 45 46 | // // SAView.m // Quartz2D // // Created by 余西安 on 14/12/1. // Copyright (c) 2014年 Sian. All rights reserved. // #import "SAView.h" @implementation SAView -(void)drawRect:(CGRect)rect { // 1、获取上下文(开启当前绘图板) CGContextRef ctx = UIGraphicsGetCurrentContext(); // 2、绘制图形 // 2.1 画矩形 // 绘制矩形,输入上下文及矩形的大小尺寸Rect // CGContextAddRect(CGContextRef c, CGRect rect) CGContextAddRect(ctx, (CGRect){50, 50, 100, 100}); // 渲染空心图形到当前View CGContextStrokePath(ctx); // 2.2 画圆(椭圆) // 绘制椭圆(圆是椭圆的一种),同样指定上下文与圆所占据的Rect即可 // CGContextAddEllipseInRect(CGContextRef context, CGRect rect) CGContextAddEllipseInRect(ctx, (CGRect){100, 200, 100, 100}); // 渲染实心图形到当前View CGContextFillPath(ctx); // 2.3 画圆弧(圆) // 将“画笔”移动到画弧的起点,如果没有这句会从上次绘图的终点“拖线”到当前绘图起点 CGContextMoveToPoint(ctx, 200, 400); // 绘制圆弧,指定圆弧的圆心、半径、弧度起点与终点,绘制方向(顺时钟或逆时钟) // CGContextAddArc(CGContextRef c, CGFloat x, CGFloat y, CGFloat radius, CGFloat startAngle, CGFloat endAngle, int clockwise) CGContextAddArc(ctx, 150, 400, 50, 0, M_PI * 2, 0); // 设置填充颜色RGB值 // CGContextSetRGBFillColor(CGContextRef context, CGFloat red, CGFloat green, CGFloat blue, CGFloat alpha) CGContextSetRGBFillColor(ctx, 0, 0, 1, 1); // 渲染实心图形到当前View CGContextFillPath(ctx); } @end |
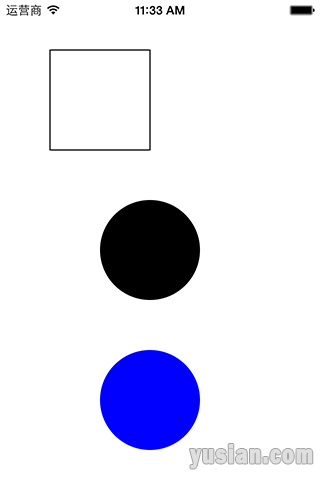
三、运行效果